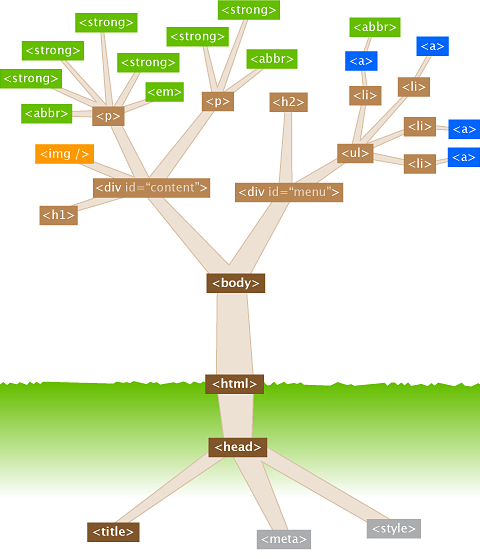
HTML Elements

HTML - Hyper Text Markup Language
HTML stands for Hyper Text Markup Language, which is the most widely used language on Web to develop web pages.
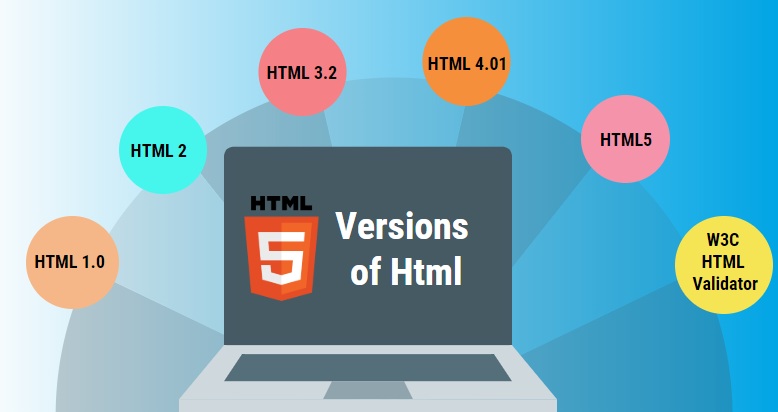
HTML was created by Berners-Lee in late 1991 but "HTML 2.0" was the first standard HTML specification which was published in 1995. HTML 4.01 was a major version of HTML and it was published in late 1999.
Though HTML 4.01 version is widely used but currently we are having HTML-5 version which is an extension to HTML 4.01, and this version was published in 2012.
HTML stands for Hypertext Markup Language, and it is the most widely used language to write Web Pages.
Hypertext refers to how Web pages (HTML documents) are linked together. Thus, the link available on a webpage is called Hypertext.
As its name suggests, HTML is a Markup Language which means you use HTML to simply "mark up" a text document with tags that tell a Web browser how to structure it to display.
Key advantages of HTML are:
Create Web site
Become a web designer
Understand web
Learn other languages
Applications of HTML are:
Web pages development
Internet Navigation
Responsive UI
Offline support
Game development
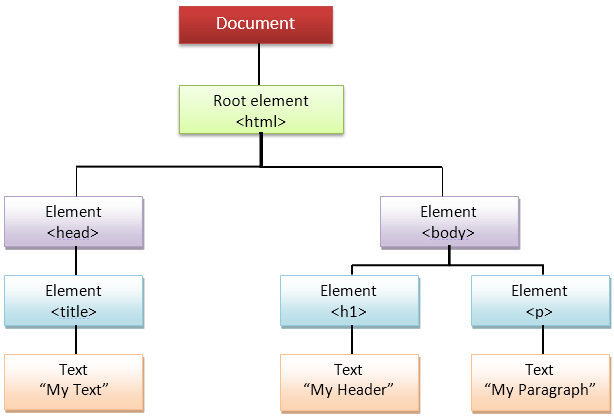
Building Blocks of HTML
An HTML document consists of its basic building blocks which are:
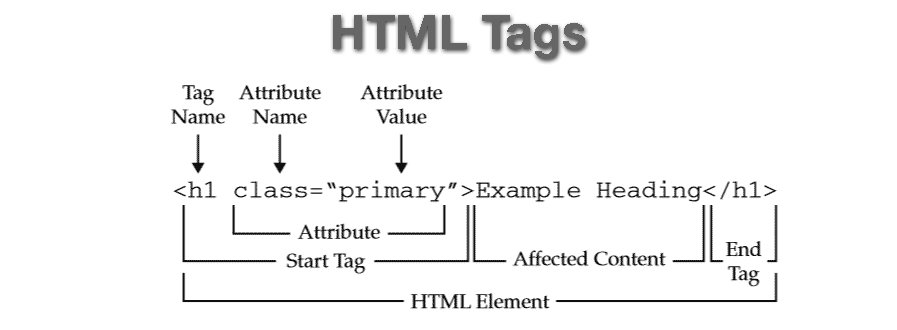
Tags -
An HTML tag surrounds the content and applies meaning to it.
It is written between < and > brackets.
All HTML tags must be enclosed within < > these brackets.
Every tag in HTML performs different tasks.
If you have used an open tag <tag>, then you must use a close tag </tag> (except for some tags).
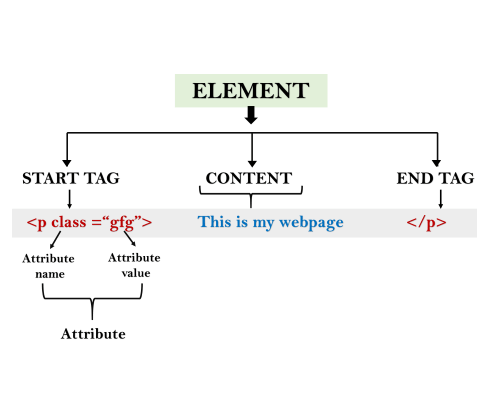
Attribute -
An attribute in HTML provides extra information about the element, and it is applied within the start tag.
An HTML attribute contains two fields: name & value.
Syntax:
<tag name attribute_name= " attr_value"> content </ tag name>
Elements -
An HTML element is an individual component of an HTML file.
In an HTML file, everything written within tags are termed as HTML elements.
- Here’s a breakdown of how elements, tags, and attributes work together:
Type | HTML Tags | HTML Elements | HTML Attributes |
Contains | Instructions on how to display an on-page element | The on-page content to be displayed | Additional information about the on-page elements |
Appearance | It starts with < and ends with > | Sandwiched within an HTML tag | Appear in the starting tag before any elements |
HTML Elements
An HTML file is made of elements. These elements are responsible for creating web pages and defining content on that webpage.
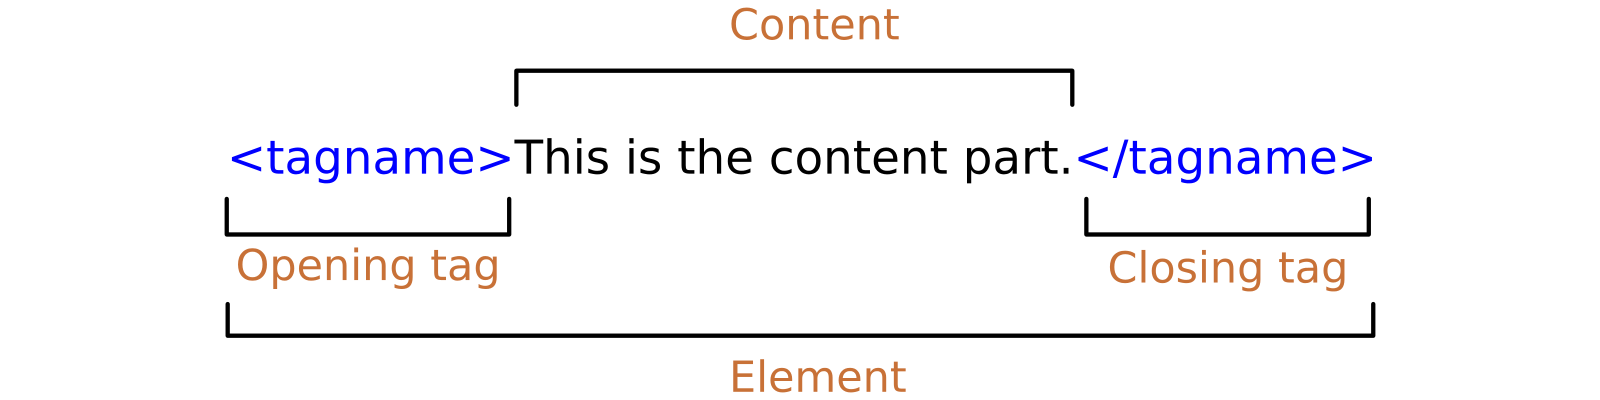
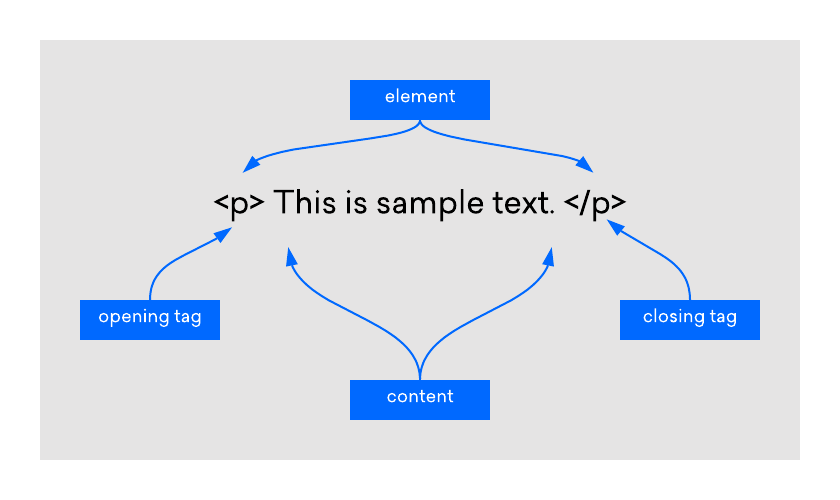
An element in HTML usually consists of a start tag <tag name>, a close tag </tag name> and content inserted between them.
Technically, an element is a collection of a start tag, attributes, end tag, and content between them.
An HTML element has a starting tag. If the element contains other content, it ends with a closing tag, where the element name is preceded by a forward slash as shown below with few tags −
| Start Tag | Content | End Tag |
| <p> | This is paragraph content. | </p> |
| <h1> | This is heading content. | </h1> |
| <div> | This is division content. | </div> |
So here <p>....</p> is an HTML element, <h1>...</h1> is another HTML element.
Some HTML elements don't need to be closed, such as <img.../>, <hr /> and <br /> elements. These are known as void elements.
HTML Headings
An HTML heading or HTML h tag can be defined as a title or a subtitle that you want to display on the webpage. When you place the text within the heading tags <h1>.........</h1>, it is displayed on the browser in bold format and the size of the text depends on the number of headings.
There are six different HTML headings which are defined with the <h1> to <h6> tags, from the highest level h1 (main heading) to the least level h6 (least important heading).
Syntax:
          <h1>Heading no. 1</h1>
          <h2>Heading no. 2</h2>
          <h3>Heading no. 3</h3>
          <h4>Heading no. 4</h4>
          <h5>Heading no. 5</h5>
          <h6>Heading no. 6</h6>

Example:
-
Headings in HTML help the search engine to understand and index the structure of a web page.

HTML Paragraph
HTML paragraph or HTML p tag is used to define a paragraph in a webpage. Let's take a simple example to see how it works.
It is a notable point that a browser itself adds an empty line before and after a paragraph. An HTML <p> tag indicates starting of a new paragraph.
Syntax:
          <p>This is first paragraph.</p>
          <p>This is second paragraph.</p>
          <p>This is third paragraph.</p>
-

Lorem Ipsum
It is a dummy text used by many web developers to test how their HTML templates will look with real data.
We can specify how many words should be generated right in the abbreviation.
lorem50 will generate a 50-words dummy text.
Void Elements
All the elements in HTML do not require to have a start tag and an end tag, some elements do not have content and end tag such elements are known as Void elements or empty elements.
These elements are also called as an unpaired tag.
Some Void elements are <br> (represents a line break) , <hr>(represents a horizontal line), etc.
1.Line Break Tag
Whenever you use the <br /> element, anything following it starts from the next line. This tag is an example of an empty element, where you do not need opening and closing tags, as there is nothing to go in between them.
The <br /> tag has a space between the character br and the forward slash. If you omit this space, older browsers will have trouble rendering the line break, while if you miss the forward slash character and just use <br> it is not valid in XHTML.
Syntax:
          <body>
          <p>To force<br> line breaks<br> in a text,<br> use the br<br> element.</p>
          </body>
Example:
2.Horizontal Lines
Horizontal lines are used to visually break-up sections of a document. The <hr> tag creates a line from the current position in the document to the right margin and breaks the line accordingly.
For example, you may want to give a line between two paragraphs as in the given example below −
Syntax:
          <body>
          <p>This is paragraph one and should be on top</p>
          <hr />
          <p>This is paragraph two and should be at bottom</p>
          </body>
Example:
-
Block-level and Inline HTML elements
For the default display and styling purpose in HTML, all the elements are divided into two categories:
Block-level element
Inline element
Block-level elements:
These are the elements, which structure the main part of a web page, by dividing a page into coherent blocks.
A block-level element always starts with a new line and takes the full width of a web page, from left to right.
These elements can contain block-level as well as inline elements.
Following are the block-level elements in HTML.
- <address>, <article>, <aside>, <blockquote>, <canvas>, <dd>, <div>, <dl>, <dt>, <fieldset>, <figcaption>, <figure>, <footer>, <form>, <h1>-<h6>, <header>, <hr>, <li>, <main>, <nav>, <noscript>, <ol>, <output>, <p>, <pre>, <section>, <table>, <tfoot>, <ul> and <video>.
Inline elements:
Inline elements are those elements, which differentiate the part of a given text and provide it with a particular function.
These elements do not start with a new line and take width as per requirement.
The Inline elements are mostly used with other elements.
Following are the inline elements in HTML.
- <a>, <abbr>, <acronym>, <b>, <bdo>, <big>, <br>, <button>, <cite>, <code>, <dfn>, <em>, <i>, <img>, <input>, <kbd>, <label>, <map>, <object>, <q>, <samp>, <script>, <select>, <small>, <span>, <strong>, <sub>, <sup>, <textarea>, <time>, <tt>, <var>.
HTML Formatting
HTML Formatting is a process of formatting text for a better look and feel. HTML provides us with the ability to format text without using CSS.
There are many formatting tags in HTML. These tags are used to make text bold, italicized, or underlined.
There are almost 14 options available that how text appears in HTML and XHTML.
In HTML the formatting tags are divided into two categories:
Physical tag:
- These tags are used to provide a visual appearance to the text.
Logical tag:
- These tags are used to add some logical or semantic value to the text.
Some physical and logical tags may give the same visual appearance, but they will be different in semantics.
1.Bold Text - <b>
The HTML <b> element is a physical tag that displays text in bold font, without any logical importance. If you write anything within <b>............</b> element, is shown in bold letters.
Anything that appears within <b>...</b> element, is displayed in bold as shown below −
Syntax:
          <body>
          <p>The following word uses a <b>bold</b> typeface.</p>
          </body>
Example:
-
2.Bold Text - <strong>
The HTML <strong> tag is a logical tag, which displays the content in bold font and informs the browser about its logical importance.
If you write anything between <strong>............ </strong> is shown important text.
Syntax:
          <body>
          <p><strong>This is an important content</strong>, and this is normal content</p>
          </body>
Example:
-
3.Italic Text - <i>
The HTML <i> element is a physical element, which displays the enclosed content in italic font, without any added importance.
Anything that appears within <i>...</i> element is displayed in italicized as shown below −
Syntax:
                                       <body>
                                          <p>The following word uses an <i>italicized</i> typeface.</p>
                                       </body>
Example:
-
4.Italic Text - <em>
The HTML <em> tag is a logical element, which will display the enclosed content in italic font, with added semantics importance.

Anything that appears within <em>...</em> element is displayed in italicized as shown below −
Syntax:
<p><em>This is an important content</em>, which displayed in italic font.</p>
Example:
-
5. HTML Marked formatting - <mark>
This tag is used to highlight text.
If you want to mark or highlight a text, you should write the content within <mark>.........</mark>.
Syntax:
<h2> I want to put a <mark> Mark</mark> on your face</h2>
Example:
-
6. Underlined Text - <u>
This tag is used to underline text written between it.
Anything that appears within <u>...</u> element, is displayed with underline as shown below −
Syntax:
<p> <u>Write Your First Paragraph in underlined text.</u></p>
Example:
-
7. Strike Text - <strike>
This tag is used to draw a strikethrough on a section of text. (Not supported in HTML5)
Anything that appears within <strike>...</strike> element is displayed with a strikethrough, which is a thin line through the text as shown below −
Syntax:
<p> <strike>Write Your First Paragraph with strikethrough</strike>.</p>
Example:
-
8. Monospaced Font - <tt>
If you want that each letter has the same width then you should write the content within <tt>.............</tt> element.
We know that most of the fonts are known as variable-width fonts because different letters have different widths.
For example: 'w' is wider than 'i'. Monospaced Font provides similar space among every letter.
Syntax:
<p>The following word uses a <tt>monospaced</tt> typeface.</p>
Example:
-
9. Superscript Text - <sup>
It displays the content slightly above the normal line
If you put the content within <sup>..............</sup> element, is shown in superscript; which means it is displayed half a character's height above the other characters.
Syntax:
<p>The following word uses a <sup>superscript</sup> typeface.</p>
Example:
-
10. Subscript Text - <sub>
It displays the content slightly below the normal line.
The content of a <sub>...</sub> element is written in subscripts; the font size used is the same as the characters surrounding it but is displayed half a character's height beneath the other characters.
Syntax:
<p>The following word uses a <sub>subscript</sub> typeface.</p>
Example:
-
11. Deleted Text - <del>
The HTML
<del>element defines the text that has been deleted from a document. Browsers will usually strike a line through the deleted text.This tag is used to display the deleted content.
Anything that appears within <del>...</del> element, is displayed as deleted text.
Syntax:
<p>My favorite color is <del>blue</del> red.</p>
Example:
-
12. Inserted Text - <ins>
The HTML
<ins>element defines a text that has been inserted into a document. Browsers will usually underline inserted text.This tag displays the content which is added.
Anything that appears within <ins>...</ins> element is displayed as inserted text.
Syntax:
<p> <del>Delete your first paragraph.</del><ins>Write another paragraph.</ins></p>
Example:
-
13. Larger Text - <big>
This tag is used to increase the font size by one conventional unit.
If you want to put your font size larger than the rest of the text then put the content within <big>.........</big>.
It increases one font size larger than the previous one.
Syntax:
<p>The following word uses a <big>big</big> typeface.</p>
Example:
-
14. Smaller Text - <small>
This tag is used to decrease the font size by one unit from the base font size.
If you want to put your font size smaller than the rest of the text then put the content within the <small>.........</small>tag.
It reduces one font size than the previous one.
Syntax:
<p>The following word uses a <small>small</small> typeface.</p>
Example:
-
HTML Attribute
An attribute is used to define the characteristics of an HTML element and is placed inside the element's opening tag.
All attributes are made up of two parts − a name and a value
Name -
- The name is the property you want to set. For example, the paragraph <p> element in the example carries an attribute whose name is aligned, which you can use to indicate the alignment of the paragraph on the page.
Value -
- The value is what you want the value of the property to be set and always put within quotations.
Attribute names and attribute values are case-insensitive. However, the World Wide Web Consortium (W3C) recommends lowercase attributes/attribute values in their HTML 4 recommendation.
We can add multiple attributes in one HTML element but need to give space between two attributes.
Syntax:
<element attribute_name="value">content</element>
Example:
The below example shows three possible values of align attribute: left, center and right.
-
1.The Title attribute in HTML
The title attribute is used as a text tooltip in most of the browsers.
It displays its text when the user moves the cursor over a link or any text.
We can use it with any text or link to show the description of that link or text.
Syntax:
                              <h1 title="This is heading tag">Example of title attribute</h1>
                              <p title="This is paragraph tag">Move the cursor over the heading and paragraph, and you will see a description as a tooltip</p>
Example:
In our example, we are taking this with a paragraph tag and heading tag.
-
2.The Style Attribute in HTML
The style attribute allows you to specify Cascading Style Sheet (CSS) rules within the element.
Syntax:
                              <p style="height: 50px; color: blue">It will add style property in element</p>
                                  <p style="color: red">It will change the color of content</p>
Example:
-
In the above statement, we have used paragraph tags in which we have applied style attributes. This attribute is used for applying CSS property on any HTML element. It provides a height to paragraph element of 50px and turns its colour to blue.
We have again used a style attribute in a paragraph tag, which turns its colour to red.
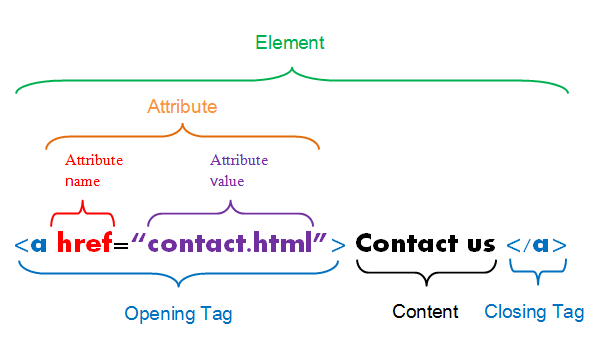
3.The href attribute in HTML
The href attribute is the main attribute of <a> anchor tag. This attribute gives the link address which is specified in that link.
The href attribute provides the hyperlink, and if it is blank, then it will remain on the same page.
Syntax:
<a href = "..........."> Link Text </a>
Example With link address:
Syntax:
<a href="https://www.google.com/">This is a link</a>
-
Example Without link address:
Syntax:
<a href="">This is a link</a>
4.The src attribute in HTML
The src attribute is one of the important and required attribute of <img> element.
It is the source for the image which is required to display on the browser.
This attribute can contain image in the same directory or another directory.
The image name or source should be correct else the browser will not display the image.
Syntax:
<img src="whitepeacock.jpg" height="300" width="600">
Example:
-
Core Attributes
A name of a classification, or list of names of classifications, to which the element belongs.
Specifies whether the contents of the element are editable.
The four core attributes that can be used on the majority of HTML elements (although not all) are −
Id
Title
Class
Style
The ID Attribute in HTML
The id attribute of an HTML tag can be used to uniquely identify any element within an HTML page.
There are two primary reasons that you might want to use an id attribute on an element −
If an element carries an id attribute as a unique identifier, it is possible to identify just that element and its content.
If you have two elements of the same name within a Web page (or style sheet), you can use the id attribute to distinguish between elements that have the same name.
Example:
                        <p id = "html">This para explains what is HTML</p>
                        <p id = "css">This para explains what is Cascading Style Sheet</p>
The Class Attribute in HTML
The class attribute is used to associate an element with a style sheet and specifies the class of the element.
The value of the attribute may also be a space-separated list of class names.
Example:
class = "className1 className2 className3"
Internationalization Attributes
There are three internationalization attributes, which are available for most (although not all) XHTML elements.
dir
lang
xml:lang
The dir Attribute
The dir attribute allows you to indicate to the browser about the direction in which the text should flow.
The dir attribute can take one of two values, as you can see in the table that follows −
Values:
ltr - Left to right (the default value).
rtl - Right to left (for languages such as Hebrew or Arabic that are read right to left).
Example:
HTML Phrase Tags
The HTML phrase tags are special purpose tags, which define the structural meaning of a block of text or semantics of text.
Following is the list of phrase tags, some of which we have already discussed in HTML formatting.
Abbreviation tag: <abbr>
Acronym tag: <acronym> (not supported in HTML5)
Marked tag: <mark>
Strong tag: <strong>
Emphasized tag: <em>
Definition tag: <dfn>
Quoting tag: <blockquote>
Short Quote tag: <q>
Code tag: <code>
Keyboard tag: <kbd>
Address tag: <address>
1. Text Abbreviation Tag - <abbr>
This tag is used to abbreviate a text.
We can abbreviate a text by putting it inside opening <abbr> and closing </abbr> tags.
If present, the title attribute must contain this full description and nothing else.
Syntax:
                           <body>
                              <p>My best friend's name is  <abbr title = "Abhishek">Abhy</abbr>.</p>
                        <p>An <abbr title = "Hypertext Markup language">HTML </abbr>language is used to create web pages. </p>
                           </body>
Example:
-
2. Acronym Tag in HTML - <acronym>
The <acronym> element allows you to indicate that the text between <acronym> and </acronym> tags is an acronym.
At present, the major browsers do not change the appearance of the content of the <acronym> element.
The <acronym> element and title attribute was used to associate a full-text explanation with an acronym.
The <acronym> element has been deprecated in HTML5 and <abbr> should be used instead.
Syntax:
<acronym title="National Aeronautics and Space Administration">NASA</acronym>
Example:
It’s true. Although all browsers still support the element, the
acronymelement is no longer valid HTML.However, we can get the same effect by using the
abbrelement instead.<acronym title="hypertext markup language">HTML</acronym><br> <abbr title="cascading style sheets">CSS</abbr>-
What both of these elements do is show the
titleattribute when a user allows their mouse to rest over the abbreviation or acronym.
3. Marked Text in HTML - <mark>
The content written between <mark> and </mark> tag will show as a yellow mark on the browser.
This tag is used to highlight a particular text.
Marked Tag has been already discussed in HTML formatting in the above.
4. Strong Text in HTML - <strong>
This tag is used to display the important text of the content.
The text written between <strong> and </strong> will be displayed as important text.
Strong Tag has been already discussed in the HTML formatting in above.
5. Emphasized Text in HTML - <emp>
This tag is used to emphasize the text and displayed the text in italic form.
The text written between <em> and </em> tag will italicize the text.
Emphasized Tag has been already discussed in HTML formatting in the above.
6. Definition Tag in HTML - <dfn>
The <dfn>...</dfn> element (or HTML Definition Element) allows you to specify that you are introducing a special term.
Its usage is similar to italic words amid a paragraph.
Typically, you would use the <dfn> element the first time you introduce a key term. Most recent browsers render the content of an <dfn> element in an italic font.
Syntax:
                           <body>
                              <p>The following word is a <dfn>special</dfn> term.</p>
                              <p><dfn>HTML </dfn> is a markup language. </p>
                           </body>
Example:
Following is an example to show how to define elements.
-
7. Quoting Text in HTML - <blockquote>
The HTML <blockquote> element shows that the enclosed content is quoted from another source.
The Source URL can be given using the cite attribute, and text representation of the source can display using <cite> ..... </cite>element.
Text inside a <blockquote> element is usually indented from the left and right edges of the surrounding text and sometimes uses an italicized font.
Syntax:
                        <blockquote cite="https://www.keepinspiring.me/famous-quotes/"><p>"The first step toward success is taken when you refuse to be a captive of the environment in which you first find yourself."</p></blockquote>
                         <cite>-Mark Caine</cite>
Example:
-
8. Short Quotations in HTML - <q>
An HTML <q> ....... </q> element defines a short quotation.
If we will put any content between <q> ....... </q>, then it will enclose the text in double-quotes.
Syntax:
                        <p>Amit is in Spain, <q>I think I am wrong</q>.</p>
                        <p>Steve Jobs said: <q>If You Are Working On Something That You Really Care About, You Don?t Have To Be Pushed. The Vision Pulls You.</q>?</p>
Example:
-
9. Code Tag in HTML - <code>
Any programming code to appear on a Web page should be placed inside <code>...</code> tags.
Usually, the content of the <code> element is presented in a monospaced font, just like the code in most programming books.
Syntax:
<p>Regular text. <code>This is code.</code> Regular text.</p>
Example:
-
10. Keyboard Tag in HTML - <kbd>
In HTML the keyboard tag, <kbd>, indicates that a section of content is a user input from the keyboard.
Syntax:
                         <body>
                            <p>Regular text. <kbd>This is inside kbd element</kbd> Regular text.</p>
                      <p>Please press <kbd>Ctrl</kbd> + <kbd>Shift</kbd> + <kbd>t</kbd> to restore page on chrome.</p>
                         </body>
Example:
When you are talking about computers, if you want to tell a reader to enter some text, you can use the <kbd>...</kbd> element to indicate what should be typed in, as in this example.
-
11. Address Tag in HTML - <address>
An HTML <address> tag defines the contact information of the author of the content.
The content is written in between <address> and </address> tags, then it will be displayed in italic font.
Syntax:
                      <address> You can ask your queries by contact us on <a href="">example123@newdomain.com</a>
                         <br> You can also visit at: <br>58 S. Garfield Street. Villa Rica, GA 30187.
                        </address>
Example:
The <address>...</address> element is used to contain any address.
-
Semantic Elements in HTML
HTML5 introduced several new tags called semantic tags.
These tags were designed to communicate the function of blocks of content that were common on many web pages.
Before HTML5, developers just used <div> tags for all blocks.
In HTML some semantic elements can be used to define different parts of a web page:
<article>
<aside>
<details>
<figcaption>
<figure>
<footer>
<header>
<main>
<mark>
<nav>
<section>
<summary>
<time>

Types of HTML Semantic Tags
Semantic tags can define different parts of a webpage.
The most common semantic HTML elements are divided into two categories based on their usage:
HTML semantic tags for structure
HTML semantic tags for text
1.HTML Semantic Tags for structure
Many semantic HTML tags communicate the layout of a page.
These “structural” tags were introduced when HTML4 got upgraded to HTML5.
That's why they're also commonly known as semantic HTML5 tags or semantic HTML5 elements.
Here are some of the most common examples:
<header>: The header tag defines content that should be considered the introductory information of a page or section
<nav>: The navigation tag is used for navigation links. It can be nested within the <header> tag, but secondary navigation <nav> tags are also commonly used elsewhere on the page.
<main>: This tag contains the main content (also called the body) of a page. There should be only one tag per page.
<article>: The article tag defines content that could stand independently of the page or site it’s on. It does not necessarily mean a “blog post.” Think of it more as “an article of clothing”—a self-contained item that can be used in various contexts.
<section>: Using <section> is a way of grouping nearby content of a similar theme. A section tag differs from an article tag. It isn’t necessarily self-contained, but it forms part of something else.
<aside>: An aside element defines content that’s less important. It’s often used for sidebars—areas that add complementary but nonessential information.
<footer>: You use <footer> at the bottom of a page. It usually includes contact information, copyright information, and some site navigation.
2.HTML Semantic Tags for Text
The semantic HTML tags for text are HTML tags that—besides the formatting—also convey the semantic function of the text they contain.
Here are some of the most common examples:
<h1> (heading): The H1 tag marks the top level heading. There’s usually only one H1 heading per page.
<h2> to <h6> (subheadings): The subheadings of various levels of importance. There can be multiple headings of the same level on a single page.
<p> (paragraph): A standalone paragraph of text.
<a> (anchor): Used to mark up a hyperlink from one page to another.
<ol> (ordered list): A list of items that are displayed in a particular order, starting with bullet points. One <li> (list item) tag contains a single item in the list.
<ul> (unordered list): A list of items that do not need to be displayed in a particular order, starting with ordinal numbers. One <li> (list item) tag contains a single item of the list.
<q> / <blockquote>: A quotation of the text. Use <blockquote> for long, multi-line quotations and <q> for shorter, inline quotations.
<em> (emphasis): Used for text that should be emphasized.
<strong> (strong emphasis): Used for text that should be strongly emphasized.
<code>: A block of computer code.

I.HTML <header> Element
Contains introductory content for a page (e.g., a banner), or a section of a page.
The
<header>element represents a container for introductory content or a set of navigational links.A
<header>element typically contains:one or more heading elements (<h1> - <h6>)
logo or icon
authorship information
Syntax:
                      <header>
                          <h1>Welcome to Web123.com</h1>
                          <nav>
                              <ul>
                                  <li>Home |</li>
                                  <li>About us |</li>
                                  <li>Contact us</li>
                              </ul>
                          </nav>
                       </header>
II.HTML <nav> Element
Contains navigation content, such as a website navigation menu.
The navigation element is used for navigation links.
It can be nested within the <header> tag, but secondary navigation <nav> tags are also commonly used elsewhere on the page.
Syntax:
          <nav>
          <a href="https://flatuicolors.com/palette/au">Font Colors1</a> |    <a href="https://flatuicolors.com/palette/gb">Font Colors2</a> |    <a href="https://flatuicolors.com/palette/ca">Font Colors3</a> |    <a href="https://flatuicolors.com/palette/in">Font Colors4</a>    </nav>
III.HTML <section> Element
A section is a thematic grouping of content, typically with a heading.
The <section> element is used to represent the standalone section within an HTML document. A page can have various sections and each section can contain any content, but headings for each section is not mandatory.
Examples of where a
<section>element can be used:Chapters
Introduction
News items
Contact information
A web page could normally be split into sections for introduction, content, and contact information.
Syntax:
                      <h2>Web designing Tutorial</h2>
                      <section>
                          <h3>HTML</h3>
                          <p>HTML is an acronym which stands for Hyper Text Markup Language which is used for creating web pages and web applications.</p>
                       </section>
                       <section>
                          <h3>CSS</h3>
                          <p>CSS stands for Cascading Style Sheets. It is a style sheet language which is used to describe the look and formatting of a document written in markup language. It provides an additional feature to HTML.</p>
                       </section>
IV.HTML <article> Element
HTML <article> element defines article content within a document, page, application, or website.
An article should make sense on its own, and it should be possible to distribute it independently from the rest of the website.
Examples of where the
<article>element can be used:Forum posts
Blog posts
User comments
Product cards
Newspaper articles
Syntax:
                      <article>
                          <h2>Today's highlights</h2>
                          <p>First story</p>
                          <p>Second story</p>
                          <p>Third story</p>
                       </article>
V.HTML <aside> Element
The <aside> element represent the content which is indirectly giving information to the main content of the page.
It is frequently represented as a sidebar.
Contains content that is tangentially related to the main content of the page (often this is presented in a sidebar).
Syntax:
                      <body>
                      <h2>My last year memories</h2>
                      <p>I have visited Paris with my friends last month. This was the memorable journey and i wish to go there again.</p>
                        <aside>
                          <h4>Paris</h4>
                          <p>Paris, France's capital, is a major European city and a global center for art, fashion, gastronomy and culture</p>
                        </aside>
                      </body>
VI.HTML <figure> and <figcaption> Element
The
<figure>tag specifies self-contained content, like illustrations, diagrams, photos, code listings, etc.The
<figcaption>tag defines a caption for a<figure>element. The<figcaption>element can be placed as the first or as the last child of a<figure>element.The
<img>element defines the actual image/illustration.Syntax:
                      <figure>
                        <img src="pic_trulli.jpg" alt="Trulli">
                        <figcaption>Fig1. - Trulli, Puglia, Italy.</figcaption>
                      </figure>
VII.HTML <main> Element
Contains the main content of the web page.
This element contains the main content (also called the body) of a page.
There should be only one tag per page.
VIII.HTML <footer> Element
The
<footer>element defines a footer for a document or section.A
<footer>element typically contains:authorship information
copyright information
contact information
sitemap
back to top links
related documents
We can have several
<footer>elements in one document.Syntax:
                      <footer>
                          <p>© Copyright 2019. All rights reserved. </p>
                       </footer>
Some Other Tags in HTML
1.Centering Content - <center>
We can use <center> tag to put any content in the center of the page or any table cell.
Syntax:
                            <center>
                               <p>This text is in the center.</p>
                            </center>
Example:
-
2. Preserve Formatting - <pre>
Sometimes, we want our text to follow the exact format of how it is written in the HTML document.
In these cases, you can use the preformatted tag <pre>.
Any text between the opening <pre> tag and the closing </pre> tag will preserve the formatting of the source document.
Syntax:
                         <body>
                            <pre>
                               function testFunction( strText ){
                                  alert (strText)
                               }
                            </pre>
Example:
-
3. Nonbreaking Spaces
Suppose we want to use the phrase "12 Angry Men." Here, we would not want a browser to split the "12, Angry" and "Men" across two lines −
An example of this technique appears in the movie "12 Angry Men."In cases, where we do not want the client browser to break text, we should use a nonbreaking space entity instead of a normal space.
Syntax:
<body> <p>An example of this technique appears in the movie "12 Angry Men."</p> </body>
Example:
when coding the "12 Angry Men" in a paragraph, we should use something similar to the following code −
-
4. Text Direction - <bdo>
The <bdo>...</bdo> element stands for Bi-Directional Override and it is used to override the current text direction.
Syntax:
                         <body>
                            <p>This text will go left to right.</p>
                            <p><bdo dir = "rtl">This text will go right to left.</bdo></p>
                         </body>
Example:
-
5. Program Output - <samp>
The <samp>...</samp> element indicates sample output from a program, and script etc.
Again, it is mainly used when documenting programming or coding concepts.
Syntax:
                         <body>
                            <p>Result produced by the program is <samp>Hello World!</samp></p>
                         </body>
Example:
-
6. HTML Anchor - <a>
The HTML anchor tag defines a hyperlink that links one page to another page.
It can create hyperlinks to another web page as well as files, locations, or any URL.
The "href" attribute is the most important attribute of the HTML tag, and links to the destination page or URL.
The href attribute of HTML anchor tag:
The href attribute is used to define the address of the file to be linked. In other words, it points out the destination page.
The syntax of the HTML anchor tag is given below.
<a href = "..........."> Link Text </a>
Specify a location for the Link using the target attribute:
If we want to open that link to another page then we can use the target attribute of <a> tag.
With the help of this link will open in the next page.
Syntax:
<p>Click on <a href="https://www.javatpoint.com/" target="_blank"> this-link </a>to go on home page of JavaTpoint.</p>
Example:
-
The target attribute can only use with href attribute in anchor tag.
If we will not use target attribute then link will open in same page.
The appearance of HTML anchor tag:
An unvisited link is displayed underlined and blue.
A visited link is displayed underlined and in purple.
An active link is underlined and red.
7.HTML <!DOCTYPE> Declaration
Every web page must start with a DOCTYPE declaration. It has to be the very first item on the very first line of your HTML or XHTML code.
This tells browsers what version of HTML the web page was coded in, which helps them to know how to process the code.
Before HTML5, DOCTYPE declarations were long and complex.
Declaration:
Here's the DOCTYPE declaration for XHTML 1.1:
<!DOCTYPE html PUBLIC "-//W3C//DTD XHTML 1.1//EN" "http://www.w3.org/TR/xhtml11/DTD/xhtml11.dtd">
In HTML5, the DOCTYPE declaration is much simpler:
<!DOCTYPE html>
All HTML documents must start with a
<!DOCTYPE>declaration.The declaration is not an HTML tag. It is an "information" to the browser about what document type to expect.
The
<!DOCTYPE>declaration is NOT case sensitive.Document Structure
| Opening Tag | Closing Tag | Description |
| <html> | </html> | Opens and closes an HTML document |
| <head> | </head> | The first of two main sections of an HTML document. The <head> section is used to provide information about the document for use primarily by search engines and browsers. |
| <title> | </title> | The title of the document. This element is nested inside the <head> section. In HTML5, this is the only required tag other than the DOCTYPE declaration. |
| <body> | </body> | The second of two main sections of an HTML document. The <body> section contains all the content of the web page. |
8.Tables in HTML
HTML tables allow web developers to arrange data into rows and columns.
A table in HTML consists of table cells inside rows and columns.
| Opening Tag | Closing Tag | Sample Attributes | Description |
| <table> | </table> | Adds a table | |
| <tr> | </tr> | Table row (start & end). | |
| <th> | <th> | scope="row" | |
| scope="col" | When creating a table to display data, use this tag to differentiate the first row or column of cells as heading cells for all the other cells in the same column or row. Browsers typically display this element bold and centered within the table cell. The scope attribute defines whether this is a row header or column header. | ||
| <td> | </td> | Table data cell. | |
| colspan="number" | Use with <th> or <td> elements. Spans cells across multiple columns. | ||
| rowspan="number" | Use with <th> or <td> elements. Spans cells across multiple rows. |
- Each table cell is defined by a
<td>and a</td>tag. Everything between<td>and</td>are the content of the table cell.
9.Marquee Tag in HTML - <marquee>
The Marquee HTML tag is a non-standard HTML element which is used to scroll a image or text horizontally or vertically.
In simple words, you can say that it scrolls the image or text up, down, left or right automatically.
Marquee tag was first introduced in early versions of Microsoft's Internet Explorer. It is compared with Netscape's blink element.
Syntax:
<marquee>This is an example of html marquee </marquee>
Example:
-
HTML Marquee Attributes:
Marquee's element contains several attributes that are used to control and adjust the appearance of the marquee.
behavior - It facilitates user to set the behavior of the marquee to one of the three different types: scroll, slide and alternate.
direction - defines direction for scrolling content. It may be left, right, up and down.
width - defines width of marquee in pixels or %.
height - defines height of marquee in pixels or %.
hspace - defines horizontal space in pixels around the marquee.
vspace - defines vertical space in pixels around the marquee.
scrolldelay - defines scroll delay in seconds.
scrollamount - defines scroll amount in number.
loop - defines loop for marquee content in number.
bgcolor - defines background color. It is now deprecated.
Disadvantages of HTML marquee:
Marquee may be distracting because human eyes are attracted towards movement and marquee texts constantly.
Since Marquee text moves, so it is more difficult to click the static text, depending on the scrolling speed.
It is a non-standard HTML element.
It draws the user's attention needlessly and makes the text harder to read.
10. Iframes in HTML
HTML Iframe is used to display a nested webpage (a webpage within a webpage). The HTML <iframe> tag defines an inline frame, hence it is also called as an Inline frame.
An HTML iframe embeds another document within the current HTML document in the rectangular region.
The webpage content and iframe contents can interact with each other using JavaScript.
Syntax:
An HTML iframe is defined with the <iframe> tag:
<iframe src="URL"></iframe>Here, the "src" attribute specifies the web address (URL) of the inline frame page.
Set Width and Height of iframe:
We can set the width and height of the iframe by using the "width" and "height" attributes. By default, the attribute values are specified in pixels but we can also set them in percentages. i.e. 50%, 60% etc.
Syntax - Example: (Pixels)
<iframe src="URL" height="300" width="400"></iframe>
Syntax - Example: (Percentage)
<iframe src="URL" height="50%" width="70%"></iframe>
We can also use CSS to set the height and width of the iframe.
<iframe src="URL" style="height:300px;width:400px"></iframe>
Remove the border of iframe
By default, an iframe contains a border around it. We can remove the border by using <style> attribute and CSS border property.
Syntax:
<iframe src="URL" style="border:none;"></iframe>
We can also change the size, color, style of the iframe's border.
Embed YouTube video using iframe:
We can also add a YouTube video on our webpage using the <iframe> tag. The attached video will be played at our webpage and we can also set height, width, autoplay, and many more properties for the video.
Following are some steps to add YouTube video on our webpage:
Goto YouTube video which we want to embed.
Click on SHARE ➦ under the video.
Click on Embed <> option.
Copy HTML code.
Paste the code in our HTML file.
Change height, width, and other properties (as per our requirement).
Syntax:
<iframe width="560" height="315" src="https://www.youtube.com/embed/UhBtpOrO6ls" title="YouTube video player" frameborder="0" allow="accelerometer; autoplay; clipboard-write; encrypted-media; gyroscope; picture-in-picture; web-share" allowfullscreen></iframe>
Example:
-
11. Images in HTML
The HTML img tag is used to display image on the web page. The HTML img tag is an empty tag that contains attributes only, closing tags are not used in HTML image element.
Syntax:
<img src="https://images.unsplash.com/photo-1633386008252-f2d3ee603dc5?ixlib=rb-4.0.3&ixid=MnwxMjA3fDB8MHxwaG90by1wYWdlfHx8fGVufDB8fHx8&auto=format&fit=crop&w=1035&q=80" alt="Good Morning Friends"/>
Example:
Let's see an example of HTML image.
-
Attributes of HTML img tag:
The src and alt are important attributes of HTML img tag. All attributes of HTML image tag are given below.
1)src - It is a necessary attribute that describes the source or path of the image. It instructs the browser where to look for the image on the server. The location of image may be on the same directory or another server.
2)alt - The alt attribute defines an alternate text for the image, if it can't be displayed. The value of the alt attribute describe the image in words. The alt attribute is considered good for SEO prospective.
3)width - It is an optional attribute which is used to specify the width to display the image. It is not recommended now. You should apply CSS in place of width attribute.
4)height - It h3 the height of the image. The HTML height attribute also supports iframe, image and object elements. It is not recommended now. You should apply CSS in place of height attribute.
Syntax:
<img src="https://images.unsplash.com/photo-1633386008252-f2d3ee603dc5?ixlib=rb-4.0.3&ixid=MnwxMjA3fDB8MHxwaG90by1wYWdlfHx8fGVufDB8fHx8&auto=format&fit=crop&w=1035&q=80" height="180" width="300" alt="Flower Iamge">
Example:
Use of height and width attribute with img tag.
-
Use of alt attribute:
We can use alt attribute with tag. It will display an alternative text in case if image cannot be displayed on browser. Following is the example for alt attribute:
Syntax:
<img src="https://images.unsplash.com/photo-1633386008252-f2d3ee603dc5?ixlib=rb-4.0.3&ixid=MnwxMjA3fDB8MHxwaG90by1wYWdlfHx8fGVufDB8fHx8&auto=format&fit=crop&w=1035&q=80" height="180" width="300" alt="Flower Iamge">
Example:
-
Use <img> tag as a link:
We can also link an image with another page or we can use an image as a link. To do this, put <img> tag inside the <a> tag.
Syntax:
<a href="https://www.worldhistory.org/buddhism/"><img src="https://www.worldhistory.org/img/r/p/1000x1200/2185.jpg.webp?v=1681654323" height="100" width="100"></a>
Example:


